February’s Project: Helping out someone

2/27/2015 Update – Unfortunatelly this project had to be cancelled cause my cousin had lots of exams due during february.

We’ll do it on late June 2015

——————————–

I have a 17yo cousin with whom I never had a very close relationship. We were always in very different stages of our lives. He was either too young our I was too intolerant with everyone else (sweet teenage years…) for us to even have a conversation..

I always thought we never had anything in common, until the last 3 Christmas dinners, where he started asking me what I do for a living. At that moment I realized not only that he was interested in technology, but also that he was quite good at it taking into account the limited resources he had. During these talks, I also noticed how thrilled he was every time I demonstrated surprise for how much he knew. When I spoke about this with our grandmother, she told me that she’s always been the only one that tells him that he IS SMART. She even had discussions about that with my cousin’s parents.

This made me start thinking how important it was in my life to always have my family telling me that I was smart and that I could accomplish things. Without them it would have been impossible for me to reach my current state, where I’m happy with who I am, what I’ve accomplished and with my plans for the future. It also reminded me how tough it was for me to start on the IT industry without knowing a single person that even knew how to do a hello world in MS Paint.

I started to think how I could help him achieve his goals, or at least help him start getting ones. So I came up with this project: I’m gonna have him move in with me for 4-5 weeks, and i’m gonna teach him the basics of programming and what it means to work in this industry. He’s gonna sit next to me while I work, using my 2nd laptop. But its not gonna be just that, i’m also gonna try to help him work in his confidence, and i’m also gonna give him a space to have men-to-men talks that he would never had with his dad (my uncle).

I still haven’t figured out what programming language i’m gonna teach him. I’m probably gonna go with basic JavaScript and maybe move to some basic web design. It’ll depend  on how fast he starts grasping the concepts. Peer programming CodeCademy courses might be a good option too.

He’s also gonna have a rather powerful gaming PC and an Xbox to play, we’re gonna have junk food whenever he wants and all that kind of teenager stuff. The goal is not to have him coding 100% of the time. I want him to have the fun and productive time that he could never had with anyone else on his side of the family.

I have the feeling that I don’t know what i’m getting into. But whatever comes out of this, i’m sure its gonna help him in some way.

Wish me luck!

Posted in Uncategorized | Leave a comment

You’ve won, C#

I’ve been working with Microsoft technologies for the past 6 years and this week I came to the following conclusion:

It makes no sense for me not to know C#.

I started as SysAdmin working with Windows 2003/08/12 servers covering technologies from AD, DNS, SQL, IIS, TFS and few others. When I met Powershell everything changed. I felt I was no longer “just an admin”. Then I realized I had to start playing with .Net libraries to automate tasks with powershell-unfriendly products such as TFS. At that moment it was clear that I didn’t had enough experience with the .net framework, which was related to the fact that I’ve been evading C# for quite a time.

Why was I evading C#? to be honest i didn’t like the syntax at first and Visual Studio was too much of an overwhelming tool when I tried to use it for the first time 4-5 years ago. Makes sense if I keep in mind that I had 2 years of experience on the industry at that moment.

Syntax and Time Spent/Results ratio were the main reason why I started with Powershell: It was way easier to learn and was applicable to my SysAdmin tasks almost immediately. Working with Powershell also made me realize I really enjoyed making tools on my own, so I decided to start with a more mature and versatile language. Even though I loved Ruby and being able to use JetBrains’ awesome RubyMine, I knew it made more sense for me to put an end to my silly rivalry with C#.

Console.writeline(“You’ve won, C#”);

PS: We’ll always have Paris, Write-host.

Posted in C#, Personal | Leave a comment

Busy, exciting, busy times

The last couple of days have been quite crazy. In a very good way.


In the 4 last weeks I:

– Heard about a job offer from a company literally across the other side of the world. I’ve known and respect this company for the past year and a half, so i was quite excited about the possibility of working with them.

– Had an interview with the company founder.

– Got the job!

– Had to tell my current boss i’m leaving.

– Had to came up with a series of knowledge transfer sessions with my replacement at my current company. I’m glad to see the new guy if picking up everything really fast.

– Had lots of calls/emails with lawyers and accountants as i will be working as a contractor (my first time).

– Had 5 exams in 10 days in college (sigh).


Funny thing is I found myself a bit cranky because i “was not learning anything new” while all this was happening. By “anything new” I’m exclusively talking about technical stuff. But the truth is i was learning tons of stuff while all this was happening. The most important ones being:

– Tons of legal/economical stuff about taxes, contracts, health insurance and other stuff that i’m gonna have to take care of on my own for the first time. This might sound terribly boring compared to going trough Pluralsight courses and doing cool stuff at work, but it turned out to be quite an interesting experience and above all: Something I was going to have to learn at a certain point of my professional career. In 14 days i went from “I hate this” to having calls with lawyers/accountants while understanding everything they said and even asking intelligent questions on my own.

– I learned that I knew all my tasks at my current job well enough to explain them to someone else, while making sense at the same time:) . I also realized that my presentation skills had drastically improved over the past 2 years (i know exactly who to thank for this).

– I realized that pretty much everyone I’ve been working with for the past years are honestly going to miss me. And not just for my technical skills. This list includes people I professionally admire and that have been key players in my career growth. I’m gonna have to write them a lengthy “thank you” email before i leave.

After thinking about all this I found myself telling me “Stop complaining, you’re doing great”.


So yeah, I’ve been busy the past days, but also excited for what’s coming.

Posted in Personal | Leave a comment

Octopus API and Powershell – Adding external Nuget Feeds to the Octopus library

The entire Octopus paradigm relies on Nuget packages. For this reason, it is very important that you have a good knowledge about how Nuget packages and Feeds work, and why they are so important on Octopus Deploy.

For this i recommend you to take a few minutes to at least read the Octopus documentation:

On this post we’ll show how to add and modify an external Nuget feed to your Octopus Deploy library. This post will be quick, as there’s no rocket science behind it. So let’s get started.


Creating a feed

We’ll use our usual snippet to create a connection to our Octopus Instance


#Adding libraries
Add-Type -Path C:\Test\Newtonsoft.Json.dll
Add-Type -Path C:\Test\Octopus.Client.dll
Add-Type -Path C:\Test\Octopus.Platform.dll

#Connection variables
$apikey = "API-CUOHLLEPUAQA8NDCBPKNMNJS2I"
$OctopusURI = "http://bsas-web-01.cloudapp.net/"

#Creating a connection
$endpoint = new-object Octopus.Client.OctopusServerEndpoint $OctopusURI,$apikey
$repository = new-object Octopus.Client.OctopusRepository $endpoint


Then we run the following code to create a new feed


$Properties = @{
FeedUri= "https://BSAS-Web-02.com/feed"
Name= "BSAS_Feed"
}

$FeedObj = New-Object Octopus.Client.Model.FeedResource -Property $Properties

$repository.Feeds.Create($FeedObj)


First we create a hashtable with the FeedURI and Name properties. Both properties are mandatory in this case.


$Properties = @{
FeedUri= "https://BSAS-Web-02.com/feed"
Name= "BSAS_Feed"
}


Then create an instance of the FeedResource class and we call it $FeedObj


$FeedObj = New-Object Octopus.Client.Model.FeedResource -Property $newFeedProp


And finally we use the Create method passing $FeedObj as an argument


$repository.Feeds.Create($FeedObj)


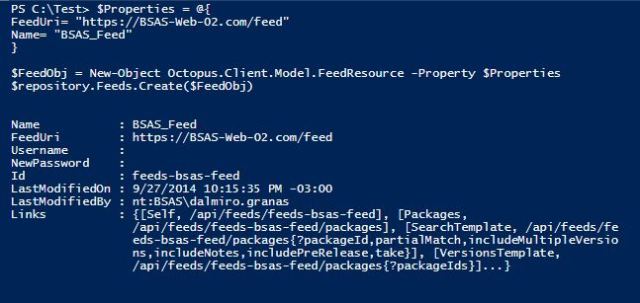
After running the code we’ll get a message from the server with the information of the feed we just created

feedconsole


To confirm that the feed was added we can go to the Octopus web UI -> Library -> External Feeds

feedwebui


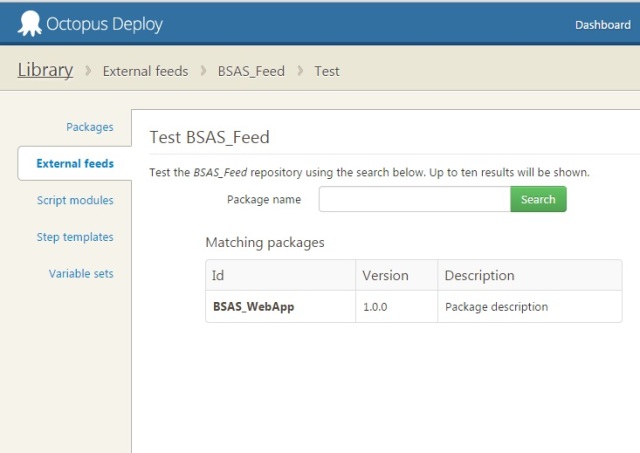
And to make sure the feed works, click on Test and then Search (leave search box blank to search all) to see all the packages on your feed. On this example I only have a package called BSAS_WebApp

feedsearch


As we mentioned at the end of the previous post it’s always a good practice to check if the feed wasn’t previously added before you run your code. The following code checks if the feed exists first, and if it doesn’t exist it goes ahead and creates it.


$FeedName = "BSAS_Feed"
$FeedURI = "https://BSAS-Web-02.com/feed"

If ($repository.Feeds.FindByName($FeedName)){

 write-output "Feed already exists: $feedname"

}

else{

 $Properties = @{
 FeedUri= $FeedURI
 Name= $FeedName
 }

 $FeedObj = New-Object Octopus.Client.Model.FeedResource -Property $Properties
 $repository.Feeds.Create($FeedObj)

}


Modifying a Feed

As always, its as easy as Get, Set, Save. The following code will help us modify our feed’s Name and URL.


# 1) Get Feed Object
$feedObj = $repository.Feeds.FindByName("BSAS_Feed")

# 2) Set the "name" property of the feed object
$feedObj.Name = "BSAS_Production_Feed"

# 3) Set the "FeedURI" property of the feed object
$feedObj.FeedUri = "https://BSAS-Web-02.com/Production/feed"

# 4) Save the changed made to the feed
$repository.Feeds.Modify($feedObj)


Thx for stopping by. If you have any questions or anything, drop a comment here or tweet me at @dalmirogranias

Posted in Octopus Deploy, Powershell | 1 Comment

Octopus API and Powershell – Creating and configuring Environments

On this post we’re going to see how to create and modify Octopus Environments using powershell. Environments have a major role in Octopus. They’re something you’ll deal with pretty often, so its good to have a strong understanding of what they are and how they work. For this, who better than the Octopus Team to explain it?

Octopus documentation: http://docs.octopusdeploy.com/display/OD/Environments


Creating Environments

First we’ll need to load the Octopus libraries and create a connection to the Octopus Server.


#Adding libraries
Add-Type -Path "C:\Test\Newtonsoft.Json.dll"
Add-Type -Path "C:\Test\Octopus.Client.dll"
Add-Type -Path "C:\Test\Octopus.Platform.dll"

#Connection variables
$apikey = "API-CUOHLLEPUAQA8NDCBPKNMNJS2I"
$OctopusURI = "http://bsas-web-01.cloudapp.net/"

#Creating a connection
$endpoint = new-object Octopus.Client.OctopusServerEndpoint $OctopusURI,$apikey
$repository = new-object Octopus.Client.OctopusRepository $endpoint

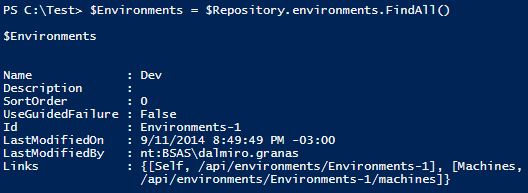
Once the connection was made we can start using $repository to do things like using the FindAll() method to get all the environments on our Octopus instance.


$Environments = $Repository.environments.FindAll()

$Environments

environments

In this case I only have 1 environment called “Dev”. We could also invoke the Count method on $environments to see how many environments we have in numbers.

environmentscount


Now we’re going to create 2 environments called “Stage” and “Production”


#Creating Staging Environment

$Properties = @{Name="Staging";Description="Such an awesome Staging environment"}

$envObj = New-Object Octopus.Client.Model.EnvironmentResource -Property $Properties

$repository.Environments.Create($envObj)

#Creating Production Environment

$Properties = @{Name="Production";Description="The most stable environment you'll ever see"}

$envObj = New-Object Octopus.Client.Model.EnvironmentResource -Property $Properties

$repository.Environments.Create($envObj)


First we create a Hashtable with the properties Name and Description. Only Name is mandatory when creating a Environments, but it’s a good practice to have meaningful descriptions (unlike the example).


$Properties = @{Name="Staging";Description="Such an awesome Staging environment"}


Then we create an instance of the EnvironmentResource class, we pass the hastable as a property and we assign it to a variable called $envObj


$envObj = New-Object Octopus.Client.Model.EnvironmentResource -Property $Properties


Finally we pass the $envObj object to the Create method


$repository.environments.create($envObj)


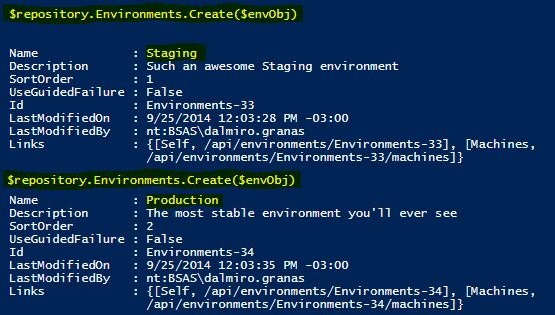
You’ll get a message from the server for each environment created. In this case one for “Production” and another one for “Stage”

createenv


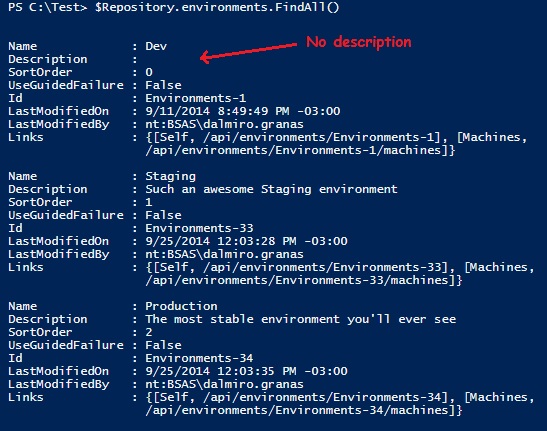
If we run FindAll() once again, we’ll see 3 environments now

nodesc


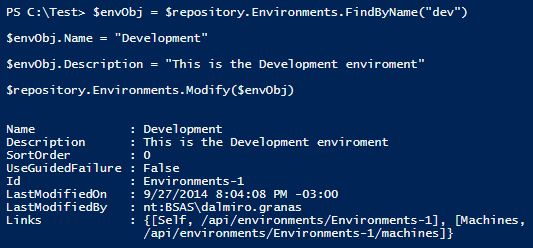
You’ll notice that the first environment doesn’t have a description and that it has the short form of the environment name (“Dev” instead of “Development”) unlike the other 2. We can add a description and change the name of the environment by running the following lines:


# 1) Get the Environment Object
$envObj = $repository.Environments.FindByName("dev")

# 2)modify the "name" property of the $envObj object

$envObj.Name = "Development"

# 3) modify the "Description" property of the $envObj object
$envObj.Description = "This is the Development environment"

# 4) Save the changes made to the environment
$repository.Environments.Modify($envObj)

Here we used the Modify method to save the changes we made locally to the environment, on the server. After running the code we’ll get the following output showing us the changes we made.

modifyenv


If we try to create an environment with the same name as an existing environment, we’ll get this error message:

rerun


So it’s a good practice to always check if the Environment exists before trying to create it:


$EnvName = ("Staging","Production")

Foreach ($e in $envName){

#using FindByName to check if the env exists
If ($repository.Environments.FindByName($e)){

Write-Output "The following environment already exists: $e"

}

#If FindByName doesn't return a result we go ahead and create the environment.
else{
$Properties = @{Name=$e;Description="Amazing description"}

$envObj = New-Object Octopus.Client.Model.EnvironmentResource -Property $Properties

$repository.Environments.Create($envObj)
}

}

Here we used an If statement to check if the FindByName() method returned a result or not.


Make sure to stay tuned for more awesomeness on Octopus and Powershell. Following me on twitter is probably the easiest way to get a heads-up every time I post a new entry.

Posted in Octopus Deploy, Powershell | 2 Comments

Octopus API and Powershell – Getting Octopus data with Powershell

On this post we’re gonna cover how to (just) get data from Octopus, using Powershell. I know: boring, huh? you want to start actually _doing_ stuff, not just running queries. Well thing is on the next posts on this series we will be creating and modifying things on Octopus, and before we do that, we’ll need to check if those things haven’t been created before as a good practice. Also, Octopus is really smart and it returns Objects after each query, so its pretty easy to format those results with powershell to have them sent to a CSV, a relational database or a log management  service (such as sumologic).

So lets get started:

The first thing we’ll always have to do is creating a connection to Octopus. For this we can use the same snippet we saw on the first post of this series


#Adding libraries
Add-Type -Path "C:\Test\Newtonsoft.Json.dll"
Add-Type -Path "C:\Test\Octopus.Client.dll"
Add-Type -Path "C:\Test\Octopus.Platform.dll"

#Connection variables
#$apikey = "API-CUOHLLEPUAQA8NDCBPKNMNJS2I"
#$OctopusURI = "http://bsas-web-01.cloudapp.net/"

#Creating a connection
$endpoint = new-object Octopus.Client.OctopusServerEndpoint $OctopusURI,$apikey
$repository = new-object Octopus.Client.OctopusRepository $endpoint

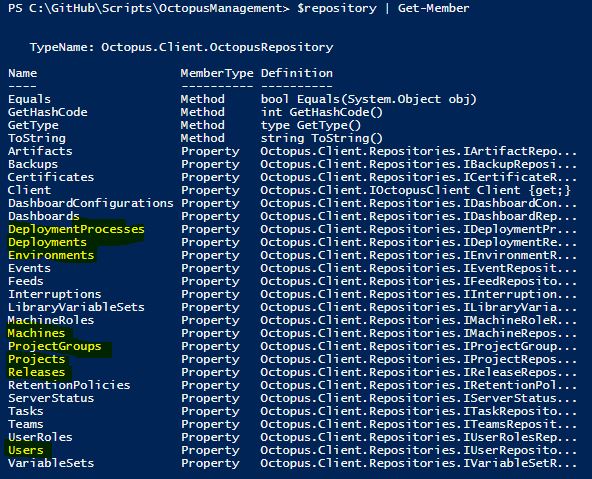
Once you run that, it’s only a matter of fooling around with the $repository object. Take a look at we get when we run get-member against $repository

repository-getmember

The highlighted properties should be ringing a bell, most likely because those are the components that you deal with on the Octopus web UI on a daily basis.

On the first post of this series we ran the following command to get all the users from the octopus instance.


#Getting all the users on this Octopus instance
$repository.Users.Findall()

See that FindAll() method on the Users object? well guess what, pretty much every object shown on the screenshot above have it. Meaning all the following examples will work:


$repository.DeploymentProcesses.FindAll()
$repository.Deployments.FindAll()
$repository.Environments.FindAll()
$repository.Machines.FindAll()
$repository.ProjectGroups.FindAll()
$repository.Projects.FindAll()
$repository.Releases.FindAll()

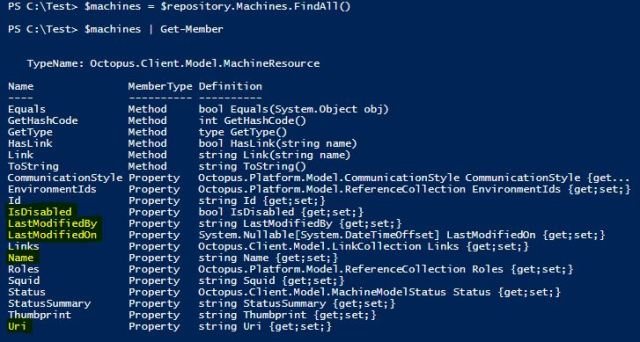
Let’s assign the results of $repository.machines.FindAll() to a variable and run get-member against it.

machines

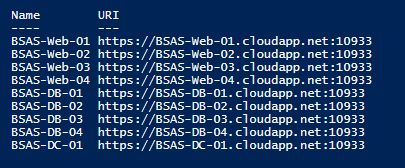
Now let’s say i want only the Name and URI properties of the all the enabled machines. We just run:


$machines = $repository.machines.FindAll()

$machines | Where-Object {$_.IsDisabled -eq $false} | Select Name,Uri

menticapture

How about a list of all the tentacles that are disabled?


$machines = $repository.machines.FindAll()

$machines | Where-Object {$_.IsDisabled -eq $TRUE} | Select Name,Uri

You can put some logic around this and get a list of Disabled tentacles via email on a daily basis. Or even better, make a a cmdlet-like script to get tentacles based on their name and Status:


<#
.Synopsis
Gets Octopus tentacles from an Octopus instance
.DESCRIPTION
Long description
.EXAMPLE
Get-Tentacle -name "WebServer01"
.EXAMPLE
Get-Tentacle -name "Web*"
.EXAMPLE
Get-Tentacle -name "Web*","DB*"
.EXAMPLE
Get-Tentacle -name "Web*" -Status Online
#>

Function Get-Tentacle
{
[CmdletBinding()]
Param
(
# Name of the tentacles.
[string[]]$Name = "*",

# Status of the tentacle. Only accepts values 'Online' and 'Offline'
[validateset('Online','Offline')]
[string]$Status
)

Begin
{

#Adding libraries
Add-Type -Path "C:\Test\Newtonsoft.Json.dll"
Add-Type -Path "C:\Test\Octopus.Client.dll"
Add-Type -Path "C:\Test\Octopus.Platform.dll"

#Connection variables
$apikey = 'API-CUOHLLEPUAQA8NDCBPKNMNJS2I'
$OctopusURI = 'http://bsas-web-01.cloudapp.net'

#Creating a connection
$endpoint = new-object Octopus.Client.OctopusServerEndpoint $OctopusURI,$apikey
$repository = new-object Octopus.Client.OctopusRepository $endpoint

#Getting all the machines. Not the sharpest solution, but way more practical for filtering.
$machines = $repository.machines.FindAll()

$output = @()

}

Process
{

foreach ($n in $name){

if($Status){
$output = $machines | ?{$_.name -like $name -and $_.status -eq $Status}
}

else{

$output += $machines | ?{$_.name -like $n}
}
}
}
End{
return $output
}
}

One last thing to mention is the FindByName() method. It allows you to pass a string to find the component you are looking for. The boomer about it is that it does not accept wildcards, so you’ll have to put in the exact name. For queries against the whole repository, i recommend you to load the results of FindAll() into one variable and then use Powershell to filter the results by column name. Take a look at examples of both approaches:


# 1)Getting one machine using FindByName
$repository.machines.FindByName('BSAS-DC-01.cloudapp.net')

# 2.1)Getting all the machines into the $Machines variable
$machines = $repository.machines.FindAll()

# 2.2)Using Powershell to filter by property value. In this case by name
$machines | ?{$_.name -eq 'BSAS-DC-01.cloudapp.net'}

The 2nd approach, even though it involves having powershell bring ALL the machines on each run, allows you to do other powerful stuff like using wildcards. For example, if i wanted to look for all the machines starting with “BSAS”, this code will do the job:


$machines = $repository.machines.FindAll()

$machines | ?{$_.name -like "BSAS*"]


This covers the basics of using the Octopus libraries to retrieve data from your Octopus instance.

On the next post we’ll start creating and modificating values on Octopus using powershell.

Posted in Octopus Deploy, Powershell | 1 Comment

Octopus API and Powershell: Getting the libraries and connecting to Octopus

If you have no idea what this post is about, make sure to check the series’ index first

Today we’re gonna talk about setting up our environment to start working with the Octopus API and Powershell. We’ll break this process into 3 parts:

  1. Getting the Libraries
  2. Getting an API Key.
  3. Making your first connection to Octopus.

1 – Getting the libraries

The files needed to start playing with the Octopus API are:

  • Octopus.Client.dll
  • Octopus.Platform.dll
  • Newtonsoft.Json.dll

You can get these files from the Octopus installation directory in either your Octopus server or your Octopus Tentacle from the following paths

From an Octopus Tentacle
  • “C:\Program Files\Octopus Deploy\Tentacle\Octopus.Client.dll”
  • “C:\Program Files\Octopus Deploy\Tentacle\Octopus.Platform.dll”
  • “C:\Program Files\Octopus Deploy\Tentacle\Newtonsoft.Json.dll”
From an Octopus Server
  • “C:\Program Files\Octopus Deploy\Octopus\Octopus.Client.dll”
  • “C:\Program Files\Octopus Deploy\Octopus\Octopus.Platform.dll”
  • “C:\Program Files\Octopus Deploy\Octopus\Newtonsoft.Json.dll”

You can also get these files by downloading the Octopus.Client Nuget package from Nuget.org with the following command:

.\nuget install octopus.client -source http://www.nuget.org/api/v2/

Capture

After running the command, the DLLs will be on their respective folders on the directory you were standing at command runtime (in this case C:\Test).

For practical purposes I’m gonna put the 3 libraries on my working directory. I recommend you to do the same, unless you are working from an Octopus server or from a tentacle, in which case I recommend you to leave the libraries where they are and just load them from there.

2 – Getting an API Key

You’ll need an API key to do anything with the Octopus’ libraries. This API key will be tied only to your user and It will allow you to authenticate against the Octopus API.

1) Open Octopus -> Click on your username at the top-right -> Profilemenu

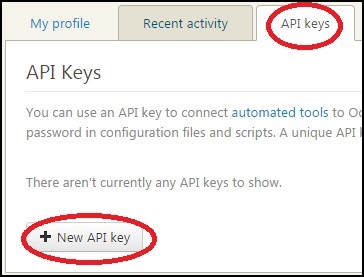
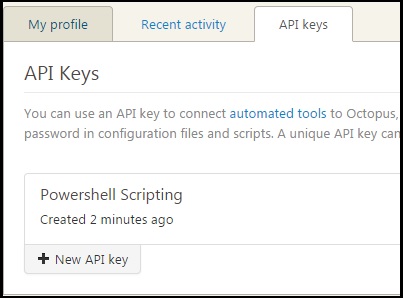
2) API key -> + New API Key

api

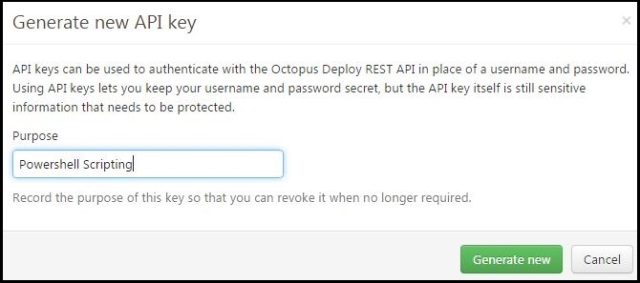
3) Fill in the Purpose with whatever you want and click on Generate New

purpose

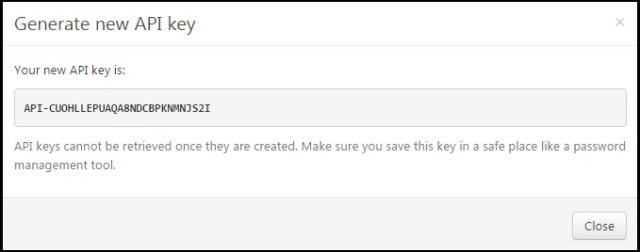
4) Once you can see the API Key, make sure you copy it to somewhere safe! cause you wont be able to recover it. If this happens, you can just create a new one.

copyapi

5) After you click on Close, you should be able to see you API key (but not retrieve it) on your menu.

postapi

3 – Making your first connection to Octopus

The script to make your first connections looks like this


#Adding libraries
Add-Type -Path "C:\Test\Newtonsoft.Json.dll"
Add-Type -Path "C:\Test\Octopus.Client.dll"
Add-Type -Path "C:\Test\Octopus.Platform.dll"

#Connection variables
#$apikey = "API-CUOHLLEPUAQA8NDCBPKNMNJS2I"
#$OctopusURI = "http://bsas-web-01.cloudapp.net/"

#Creating a connection
$endpoint = new-object Octopus.Client.OctopusServerEndpoint $OctopusURI,$apikey
$repository = new-object Octopus.Client.OctopusRepository $endpoint

#First example of Querying Octopus from Powershell
#Getting all the users on this Octopus instance
$repository.Users.FindAll()

First we load the 3 libraries into our Powershell session.


#Adding libraries
Add-Type -Path "C:\Test\Newtonsoft.Json.dll"
Add-Type -Path "C:\Test\Octopus.Client.dll"
Add-Type -Path "C:\Test\Octopus.Platform.dll"

We create 1 variable to hold the API Key and another one for the Octopus URI. Then we use those values to create an Endpoint instance

#Connection variables
#$apikey = "API-CUOHLLEPUAQA8NDCBPKNMNJS2I"
#$OctopusURI = "http://bsas-web-01.cloudapp.net/"

We use the variables to create an Endpoint instance, and then we use it to create a connection to the Octopus Repository

#Creating a connection
$endpoint = new-object Octopus.Client.OctopusServerEndpoint $OctopusURI,$apikey
$repository = new-object Octopus.Client.OctopusRepository $endpoint

Then we make our first call against the Octopus API. In this example we are getting all the users on this octopus instance

#First call to Octopus from Powershell
#Getting all the users on this Octopus instance
$repository.Users.FindAll()

After you run the complete code, you should get a result similar to this:

users

In this case i have only 1 user called BSAS\dalmiro.granas

And that’s it for today. On the next post i will be using everything i explained on this post to start doing some cooler stuff with the Octopus API.

Posted in Octopus Deploy, Powershell | 2 Comments

Using the Octopus API from Powershell

By far, one of the coolest things about Octopus Deploy is how it was built on top of their REST API. This means that anything that can be done through the UI can be done through the API (direct quote from Octopus team)

On this series I’m gonna cover how to use the Octopus Client library to unleash the power of Octopus using Powershell. The goal is that by the end of this series, you’ll be able to use Powershell to automate anything that you’ll normally be able to do using the Web UI. You’ll also be able to use Powershell to query information from Octopus’ Database for reporting or diagnostics purposes.

For this series I will work with the following assumptions:

  • You know how to deal with Nuget Packages.
  • You already have experience with Octopus Deploy and you want to start automating tasks without using the web UI.

I’m gonna break down this series into the following posts:

  1. Getting the libraries and connecting to octopus.
  2. Getting Octopus data with Powershell.
  3. Creating and Configuring Octopus Environments.
  4. Adding external Nuget Feeds to the Octopus library.
  5. Creating and configuring Octopus Teams.
  6. Creating Octopus Project Groups and Projects.
  7. Adding Roles, Projects and Environments to Octopus teams.
  8. Adding Active Directory Groups to Octopus teams.
  9. TBD.

So stick around.

Posted in Octopus Deploy, Powershell | 2 Comments

Things you’ll be reading about on this blog

I’m gonna use this blog as a place to share my experiences with the technologies I’m currently working with. I’ll be also sharing all the useful learning material i find about these technologies.

For the moment i’m interested on:

Azure – Currently one of my main interests. As an infrastructure guy, pretty much everything i work on depends on having a good enterprise-like scenario for testing. I usually work with 1 Domain Controller/DNS/DHCP, 2 Web servers (1 acting as server and the other one as client) and a Database server (SQL or Mongo depending on my needs). Every single thing i learn to do in Azure (and in windows systems in general), i learn to do it both from the UI and from Powershell. You’ll see a lot of Powershell in this blog 😉

Powershell – Automation is among the things I enjoy the most about my daily work and on Windows systems Powershell is the way to go. I’m a huge fan of this language so you will always find Powershell posts on this blog.

DSC – Infrastructure guy + automation + Powershell = DSC. There’s just no other way around it.

Octopus Deploy – I’m currently working on a company-wide innitiative to start using Octopus Deploy as the main tool for .net deployments. I must say i’m never, ever going to use another tool other than Octopus for .net deployments. This is among my top interests currently and i really hope to master this tool so i can implement it wherever i go.

Ruby – Mostly because i want to start my path on Linux configuration automation using Chef.

Starting tomorrow i’ll start a week long series called “Using Octopus Client library with Powershell“.

So stick around and follow me on twitter to find out about my latest posts.

Posted in Uncategorized | Leave a comment

Just Start

I’ve been reading a lot of articles and watching a lot of videos lately about having your own blog and sharing some of your experiences. They all have different approaches and techniques on how to do this, but all of them agree on the starting concept:

“You know something and there’s someone out there that will find what you write useful. So stop reading this and Just Start “.

So here I go.

Posted in Uncategorized | Leave a comment